Edit Wall Properties
Several options and features are available to customize the walls in your project.
Interface
The illustration below shows the Wall Properties Panel, which appears on the right side of the screen when you click on a wall. This panel allows you to make various changes and adjustments, such as height, materials and much more.
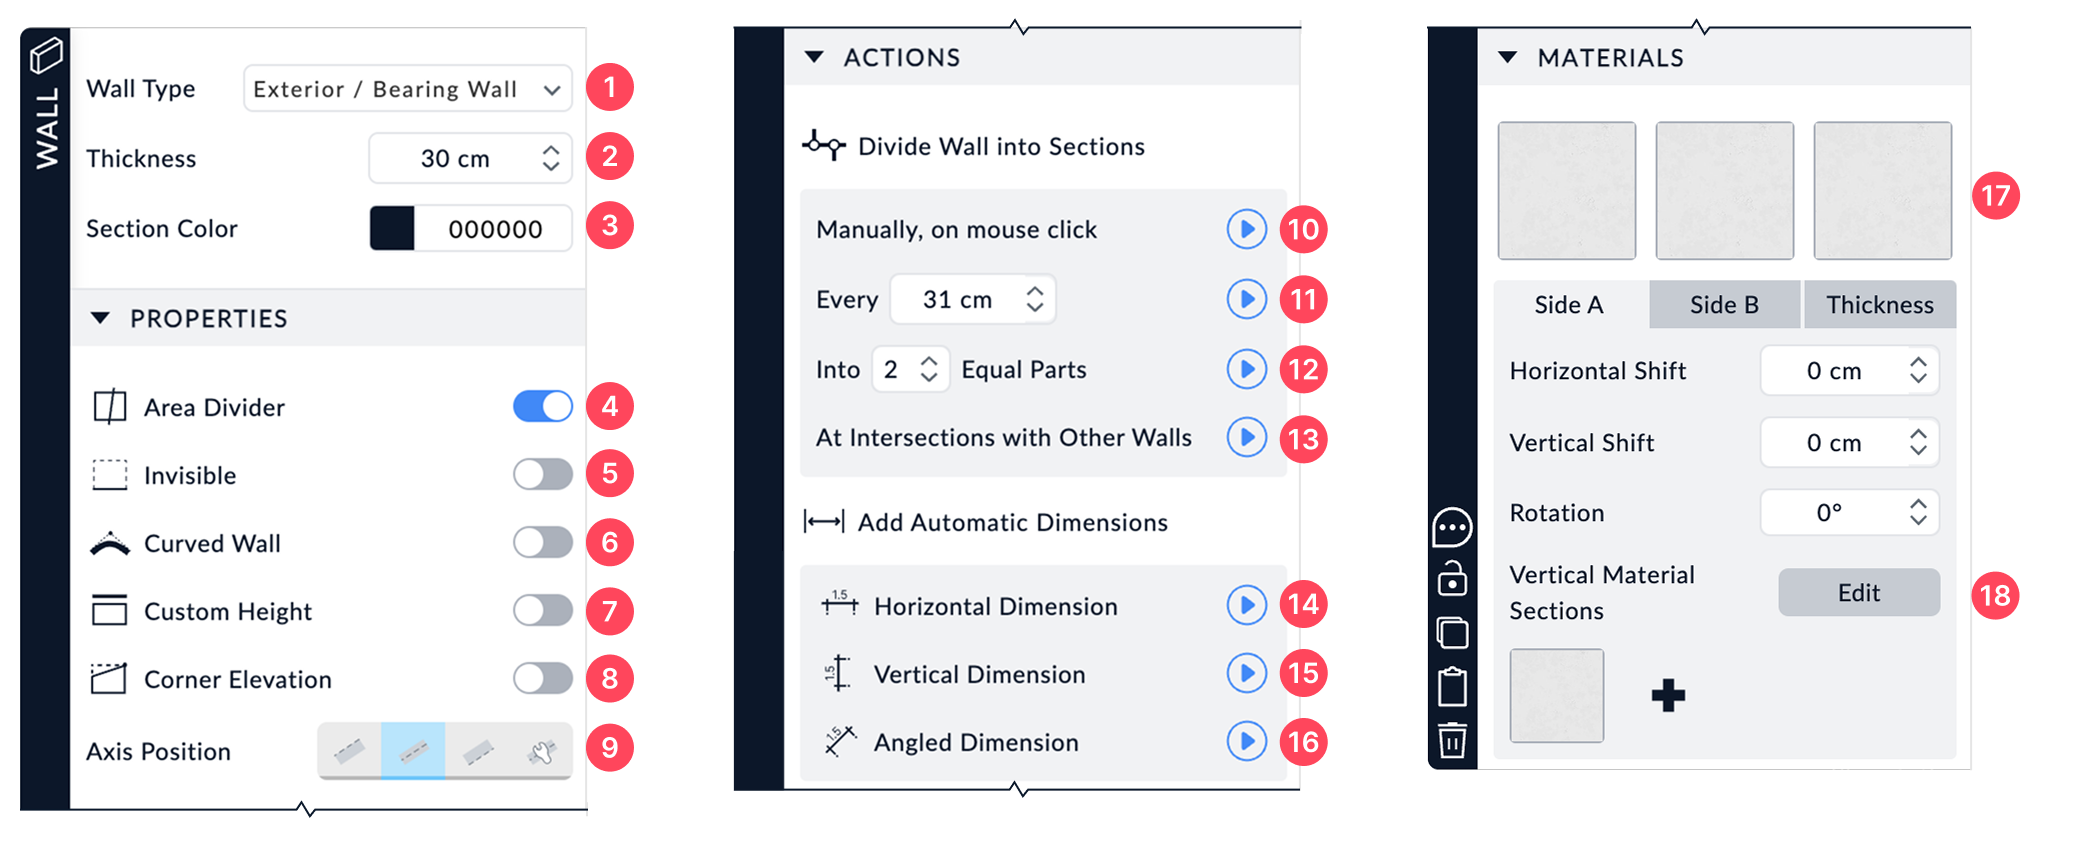
Wall Properties Panel in Space Designer 3D
Main Parameters
1. Wall Type
You can choose the type of wall to draw in your project. By default, two types are available:
- Exterior / Bearing Wall: 30 cm thick by default, designed to support the building’s structure.
- Interior / Partition Wall: 10 cm thick by default, used to separate spaces without structural purpose.
You can quickly change the selected wall type using the dropdown menu.
If you frequently use a specific wall type, you can add it in the Wall Type Customization Window.
2. Wall Thickness
The wall thickness is set according to the unit defined in the Project’s General Preferences. You can manually adjust this value for each wall based on your needs.
3. Section Color
Defines the display color of the wall in 3D sectional view. This setting allows you to highlight specific walls in your project or distinguish between different wall types.
By default, the wall section color is black, but you can switch it to light gray for a less contrasted 3D rendering.

Left, default color: 000000 | Right, modified color: DDDDDD
Properties
4. Area Divider
When this option is enabled, the wall is used to define the area calculation of a room. Conversely, when this setting is disabled, spaces like closets or storage areas are included in the total room area.
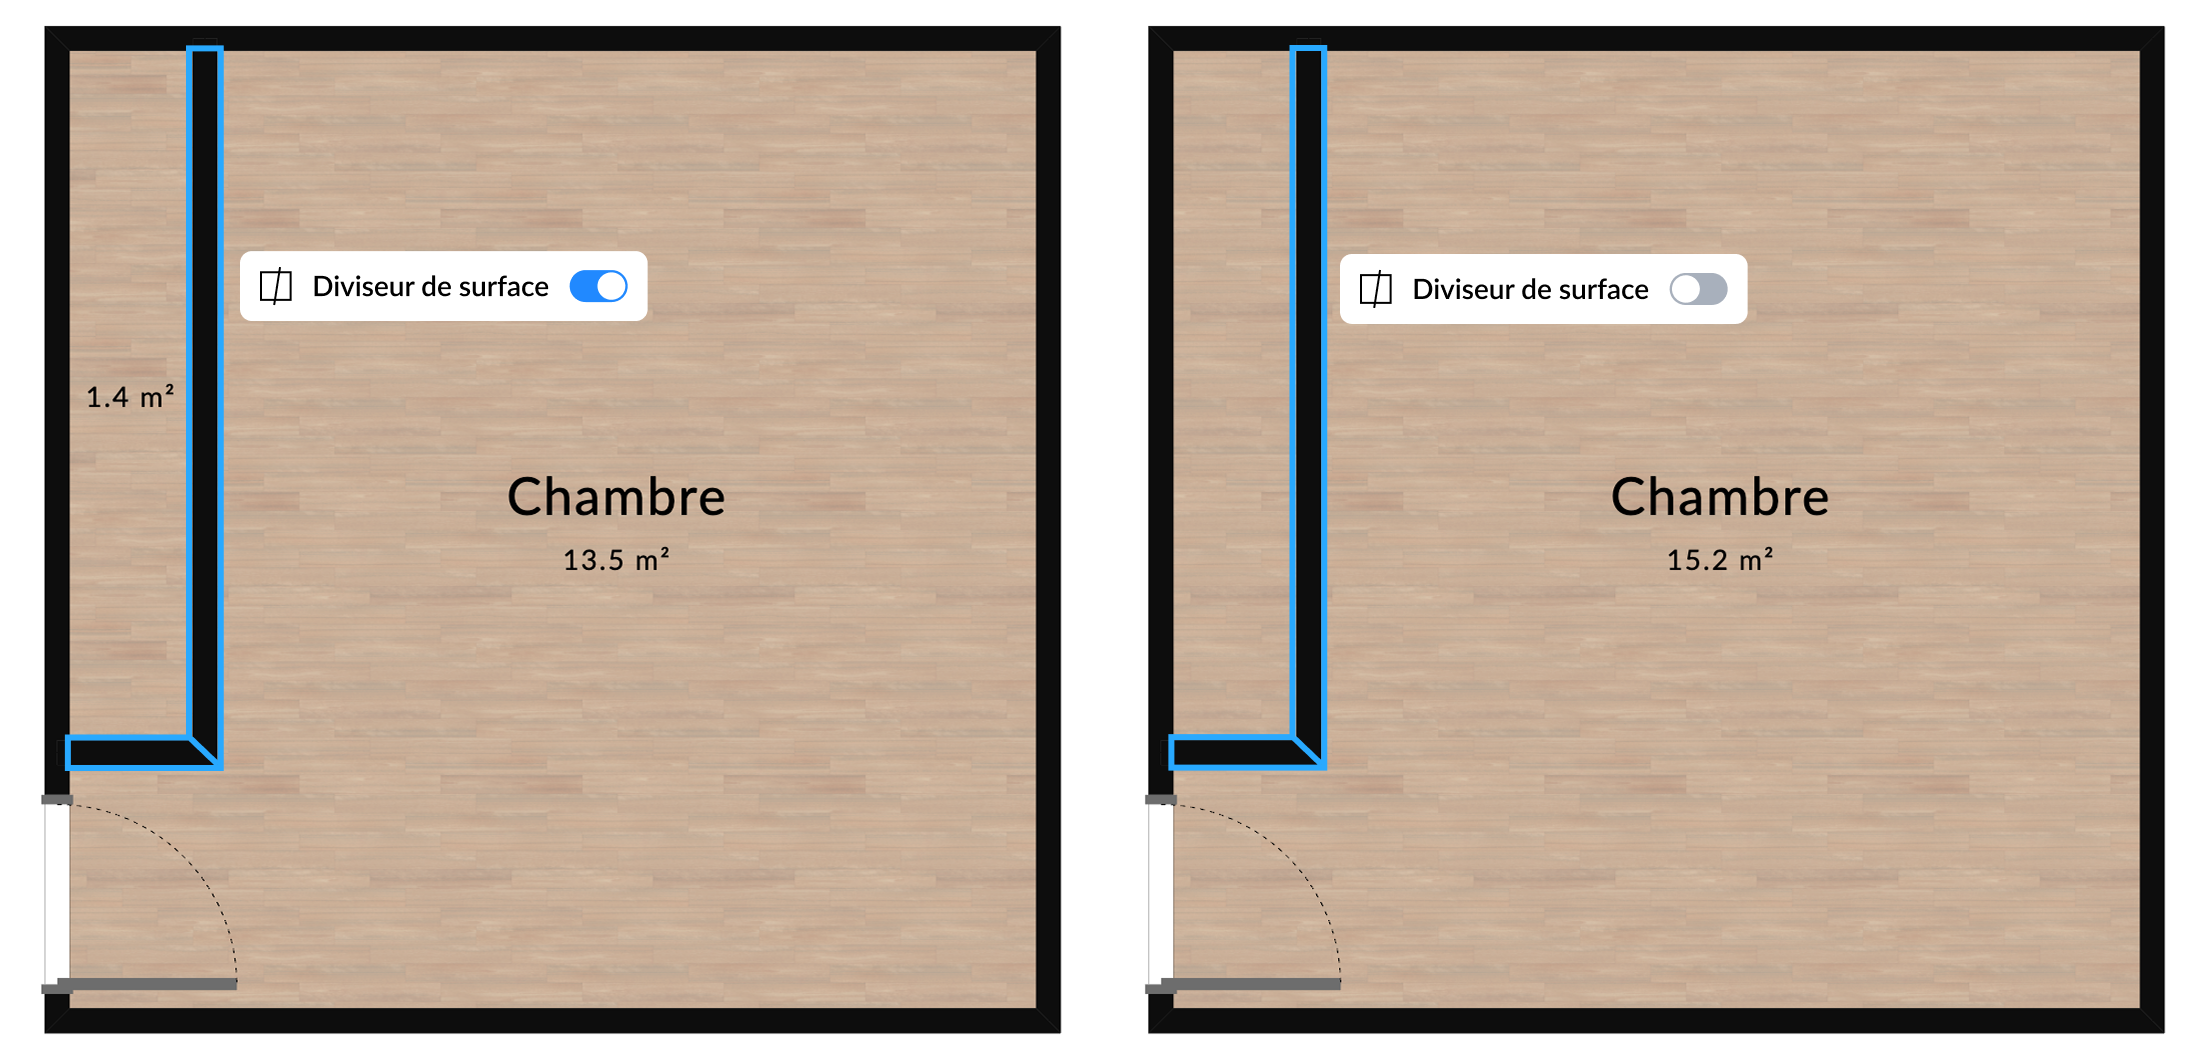
In the example above:
- Left: The closet walls are set as area dividers. The inner space of the closet (1.4 m²) is excluded from the bedroom’s total area, which is calculated as 13.5 m².
- Right: The same walls are not set as area dividers. The closet is included in the total area, bringing the bedroom’s surface to 15.2 m².
This option helps you adjust area calculations based on your specific layout needs.
Even if a wall is set to Invisible, it will still define separate surface areas if the Area Divider option is enabled.
5. Invisible
The Invisible option makes the wall invisible in 3D view and displays it as a dashed line in the 2D plan. It allows you to virtually divide a space without placing a visible wall.
This feature is useful for separating the surface area of two spaces without a physical partition, while still allowing for different flooring materials. For example, it can be used to visually distinguish an open kitchen from a dining area:

6. Curved Wall
The Curved Wall option allows you to transform a straight wall into a curved one. Once enabled, two parameters can be adjusted:

a. Roughness
Defines the smoothness level of the curve – a low roughness results in a smooth and rounded curve. A high roughness produces a more angular curve with clearly segmented lines.

Left: minimal roughness | Right: maximal roughness
b. Curve Type
The curvature mode can be selected from the dropdown menu, with three available options:
- By Control Point – The curve is defined using control points placed along the wall, allowing precise manipulation of its shape.
- Smooth Interpolation – Creates a fluid curve by automatically adjusting the segments for smooth transitions between points.
- Linear Interpolation – Garde une courbe avec des segments droits, offrant un effet angulaire plus géométrique.

Left: By Control Point │ Center: Smooth Interpolation │ Right: Linear Interpolation
7. Custom Height
By default, a wall adopts the height defined by the level it’s drawn on. This option allows you to define a specific height for a wall, regardless of the default level height. When enabled, an input field appears so you can enter a custom height for the selected wall.

8. Corner Elevation
The Corner Elevation option allows you to adjust the height of each end of a wall to create a slope. This feature is especially useful for walls located under a sloped roof.


Available parameters:
- Left End – Sets the height of the wall’s left end.
- Right End – Sets the height of the wall’s right end.
- Extend to Roof – Automatically adjusts the wall height to follow the roof slope. Ideal for creating a gable wall under a double-pitched roof.
9. Axis Position
This option defines the wall’s alignment in relation to its reference axis. It is useful for positioning walls precisely according to your design needs.

Available alignment modes:
- Left-Aligned – The wall is positioned to the right of its reference axis.
- Centered – The reference axis runs through the center of the wall.
- Right-Aligned – The wall is positioned to the left of its reference axis.
- Custom – Define a specific offset by using the Shift Left and Shift Right options.
Actions – Divisions
Here are the different options for dividing a wall into sections and automatically adding dimensions allow you to design your project with precision.
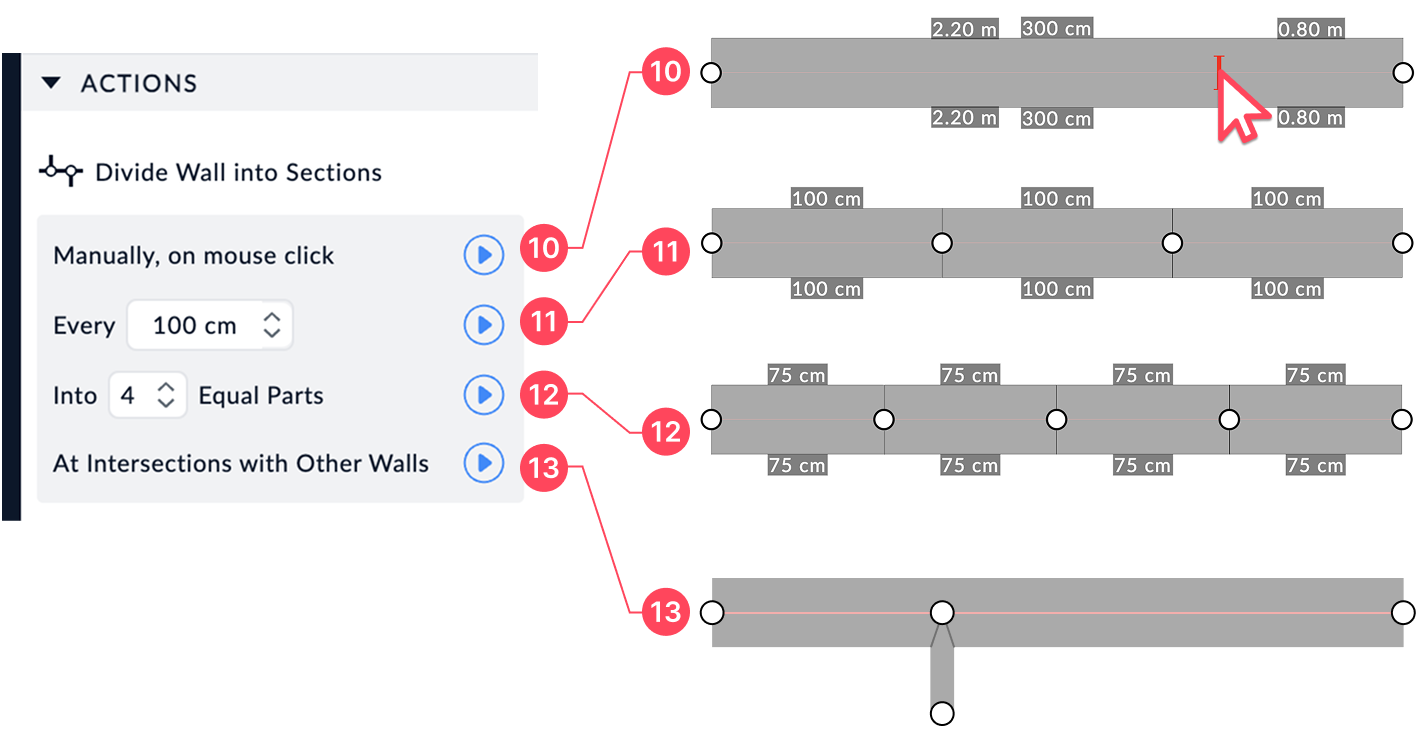
10. Manual Division
Allows you to divide a wall by clicking directly at the desired point.
11. Division at Regular Intervals
Define a specific distance in centimeters to divide the wall into equal-length sections. For example, entering 100 cm will automatically split the wall into segments of that length.
12. Equal Parts Division
Splits the wall into a set number of equally sized sections. For example, entering 3 will divide the wall into three equal parts.
This option is especially useful if you want to apply different materials to each section of a wall. You can also use the Vertical Material Sections feature to apply multiple materials to a single wall without splitting it.
13. Division at Wall Intersections
Automatically divides the wall at every point where it intersects with another wall.
This option is particularly helpful if you want to apply different materials to the outer sides of walls between adjacent rooms.
Actions – Dimensions
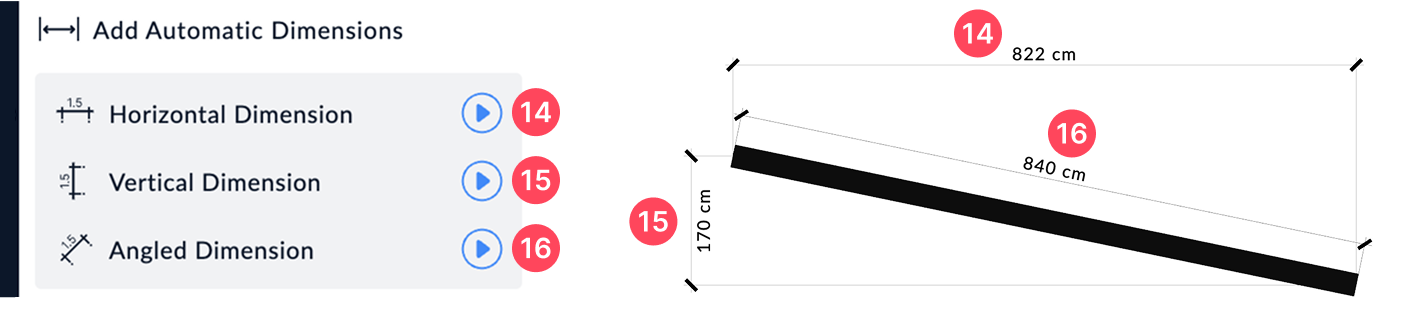
14. Horizontal Dimension
Displays the horizontal orthogonal measurement between the two endpoints of the wall on the plan.
15. Vertical Dimension
Displays the vertical orthogonal measurement between the two endpoints of the wall on the plan.
16. Angled Dimension
Displays a non-orthogonal measurement that follows the slope or angle of the wall.
Materials
The materials applied to wall surfaces can be adjusted via the Materials panel. This menu allows you to modify the appearance of the different parts of a wall and fine-tune their positioning for a precise finish.

17. Wall Surfaces

Each wall is made up of three distinct parts that can be customized:
- Side A – The outer or inner face of the wall.
- Side B – The face opposite to Side A.
- Thickness – The visible edge of the wall, often around openings (doors, windows).
- Section – The top edge color visible in 3D view can also be customized (see above Section Color).
Click on the material icon to edit the appearance of the selected side. Then, use the editing panel to fine-tune the alignment of the texture with the following parameters:
- Horizontal Shift – Adjusts the texture along the X axis.
- Vertical Shift – Adjusts the texture along the Y axis.
- Rotation – Rotates the applied material.
When you select a wall face, it appears highlighted in blue in the 3D model view to help with editing.
In addition to these main surfaces, you can apply specific materials to vertical sections of the wall using the Vertical Material Sections option.
Eyedropper Tool
The Eyedropper Tool lets you quickly copy a material applied to one element and assign it to another.
This tool is ideal for harmonizing surfaces without having to manually search for a material in the library.
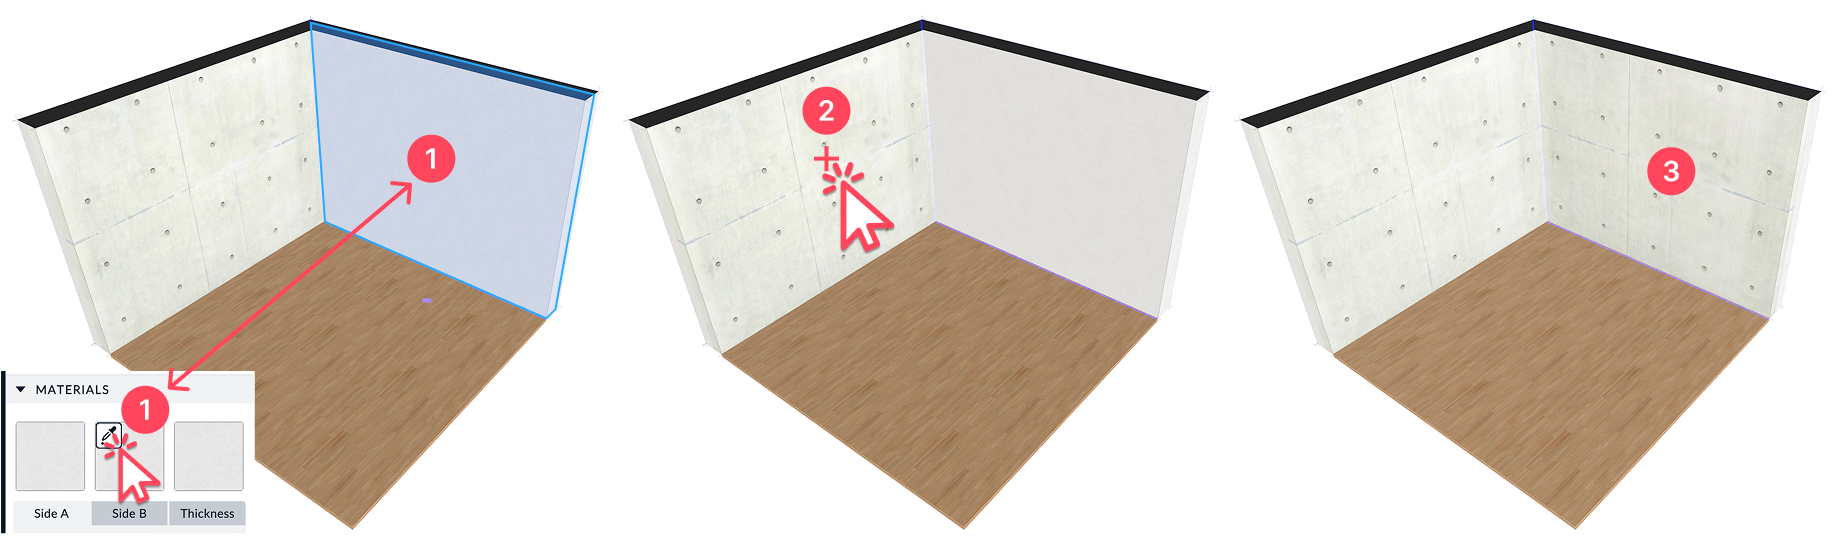
Steps to copy a material:
- Select the eyedropper: Click the eyedropper icon on the material thumbnail of the wall you want to change.
- Pick an existing material: Click on a pre-textured surface to sample its material. A cross appears in front of your cursor to indicate the selection.
- Apply the material: The sampled material is instantly applied to the selected surface.
18. Vertical Material Sections
This feature allows you to apply multiple materials to the same wall without splitting it. You can divide a wall into distinct vertical sections and assign each one a different finish.
Ideal for customizing walls with different materials without structural changes.

How does it work?
- Add new sections by clicking the + button in the Materials panel.
- Click on the plan to move or manually add new section points.
- A new tile appears in the panel, and you can assign a material to it by clicking on the thumbnail.
You can reorder materials by dragging and dropping them to adjust their position along the wall.